Wanting to create a simple blog or a site for maybe personal use? Or maybe for a demo? or maybe a project portfolio? Hosting fees at most providers usually runs into 100+USD annually. Wondering how to get hosting fees down and get better performance? In this article, we discuss how to host static website on S3 service from AWS. We will walkthrough all the steps required from domain registration to setting up https for security, CDN for fast performance.
What is a Static Website?
Most websites serve html, css and some scripting pages to any user's browser. Sometimes the scripting pages are dynamic and usually chat with a database to get or show some data to the user. Static websites on the other hand only serves html, css & maybe some javascript. None of this involves any need for server side processing. Since we do not need any server side processing, there is no need for a server to be serving the website(most traditional hosting companies do this). Most blogs, portfolio sites, resume sites etc can be served as static websites.
Static websites are incredibly cheap to run. Sometimes as less as 4-5 USD a year for hosting costs. Obviously this depends on number of users. They are also incredibly fast as compared to dynamic sites, since all you are serving is static pages. You also do not have to worry about scaling if you hit big. Most providers for static websites scale as per the demand.
What is AWS S3?
Simple Storage Service (S3) is a file storage service offered by Amazon. You can upload files to it. Then it provides easy, fast, reliable & scalable access to those files via http/https. What this means is that theoretically you can save all pages of your static site inside S3. Then configure it in a way that any user of your site gets those html, css & javascript pages delivered from S3. You can read more about S3 here .
I will walk through the whole process using example.com as the domain I am setting up. It will be your responsibility to make sure you change example.com to your domain name. Without much delay, here are all steps to setup a static website on S3:
Steps in Detail
Register a custom domain with Route 53
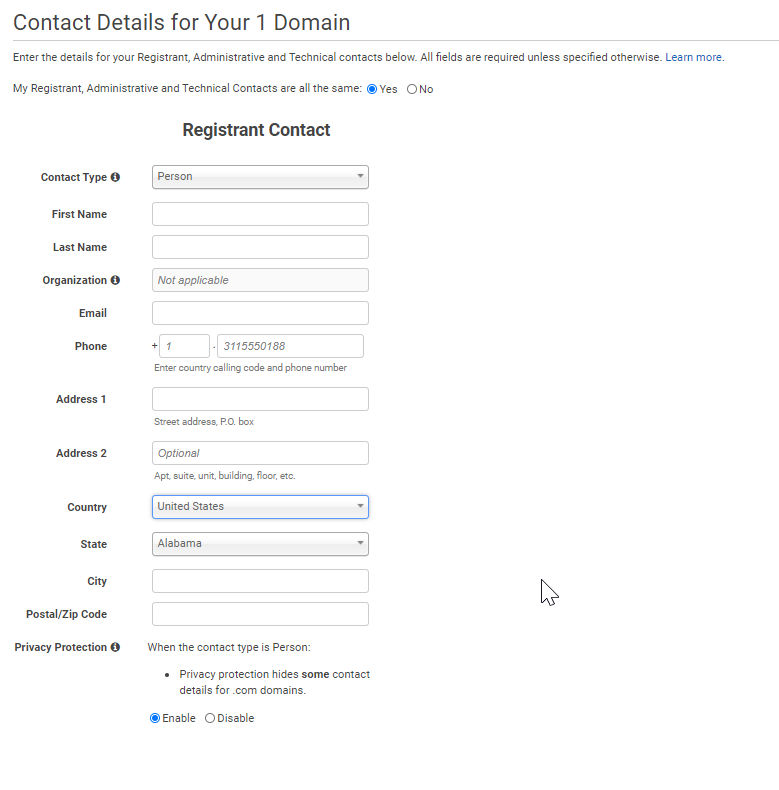
Before you go about setting up a static website on S3, you would need a registered domain. You can register it using namecheap or some other 3rd party or you can use AWS Route 53 to register one for your self. I will walk through buying a domain name using Route 53. One big requirement for setting up static website using S3 is that the name of your site and the bucket name should match . If your site name will be example.com , you need to make sure that on AWS S3, the name example.com is available for a bucket. Remember on S3 bucket names are unique globally across all accounts. So I would suggest to check on route 53 that example.com is available & also on S3 that the bucket name is available.
- On Route 53 check for the domain name and add it to cart.

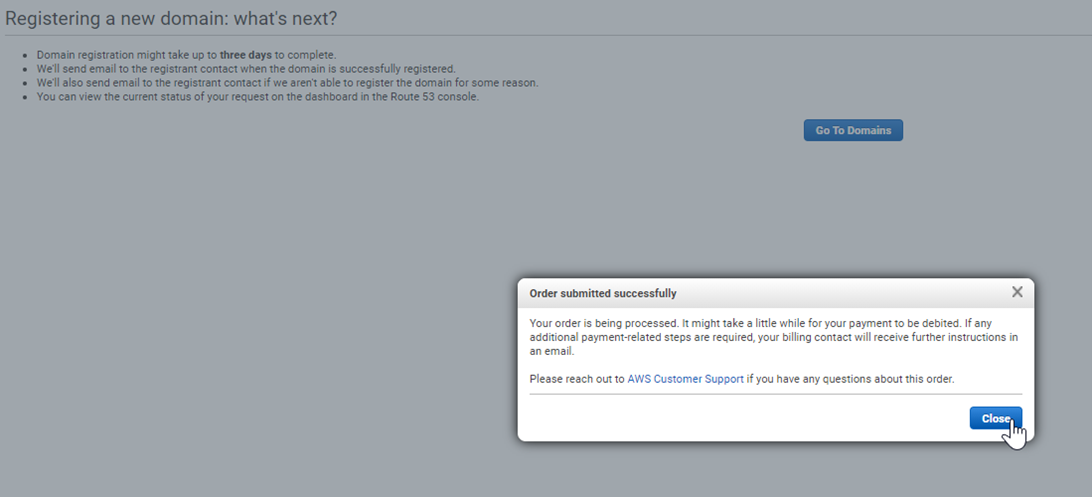
- Next fill all your personal info & complete your order. It will take a few minutes but eventually you should get an email with confirmation of your order.
You will get an email with all details after some time of confirming the order.
Create 2 S3 buckets
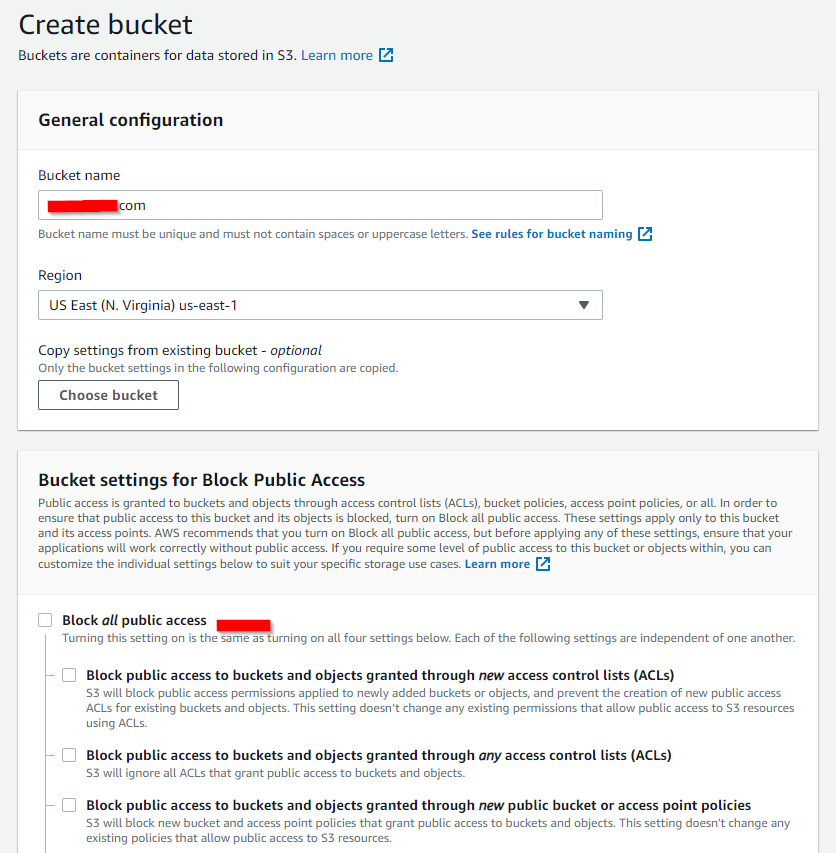
- Now quickly, go over to the S3 console and create a bucket with the same domain name example.com in a region of your choice. I choose us-east-1 here in my example. Region can depend on where your users are located, or if you have to follow some GDPR laws, etc.
-
Scroll down till you see a section called Block Public Access
-
Uncheck this. Its a catch all setting from AWS to override pubic access to any objects inside a bucket that were given public access mistakenly. However since our whole purpose is to set the bucket up for static website access so anonymous users on internet can visit it, we will uncheck this.
-
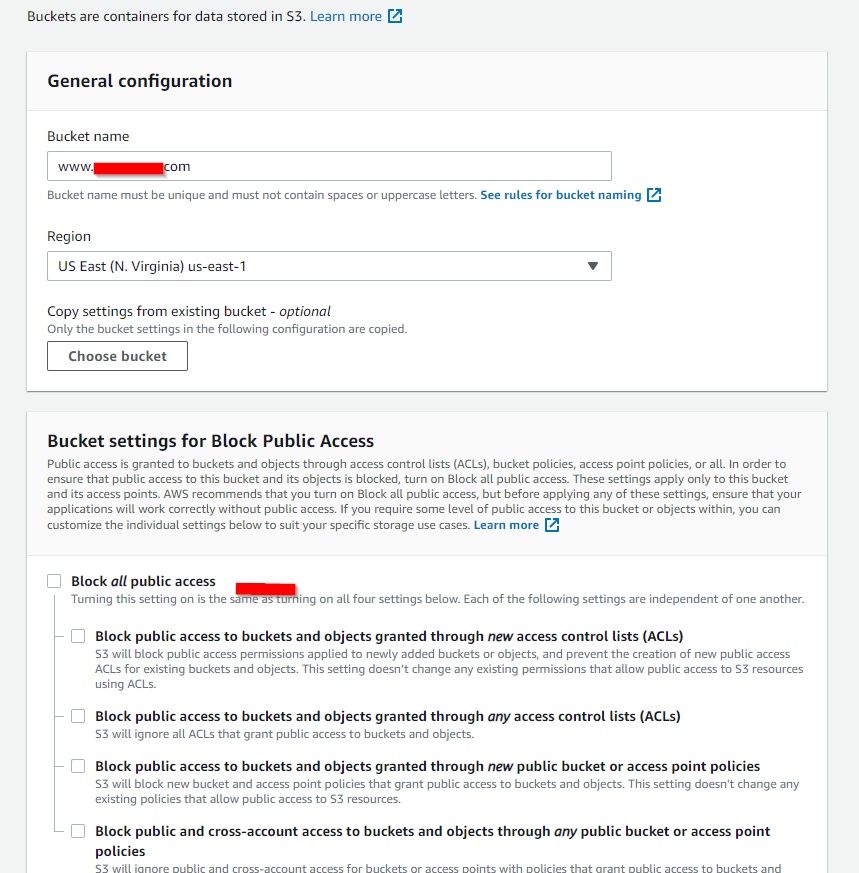
Next, also create another bucket with the name www.example.com. This bucket will be a subdomain. In case users enter www.example.com as the address, we will set it up a redirect to the main/root version of the site at example.com. This helps with better SEO rankings since there is only 1 version of your site at example.com address.
Enable static website hosting for root domain bucket
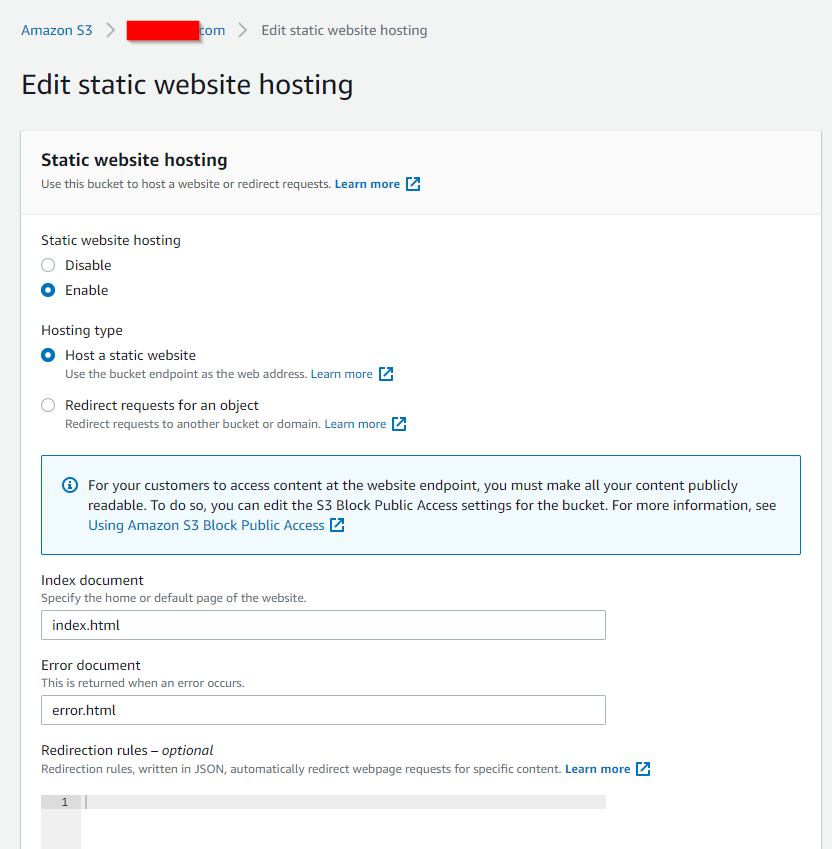
- Now go back to your root domain (example.com) bucket and click on properties tab. Scroll all the way down till you see Static Website Hosting and click edit. Under this screen, please select enable static website hosting .
-
Then also select host a static website under Hosting type option.
-
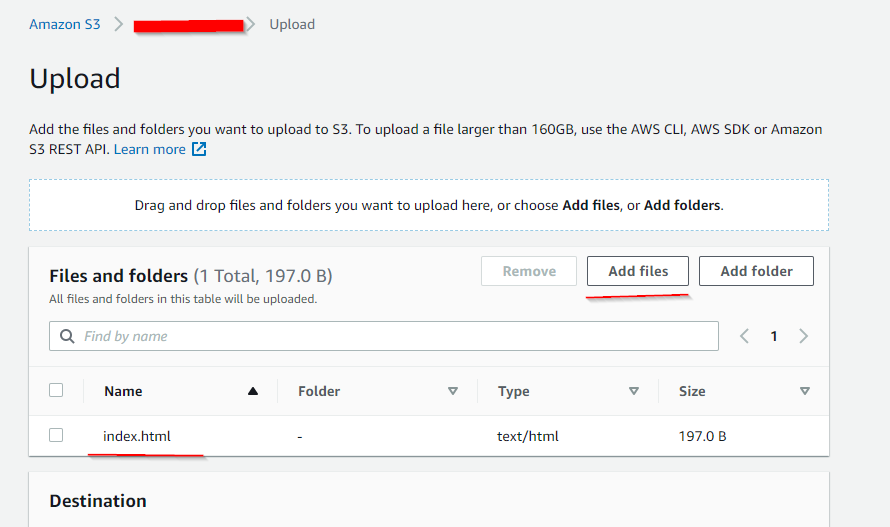
Now we will specify a default page of our site. lets enter index.html . An error page and lets name it error.html . You can even use the sample pages from my git repo and upload these for testing.
- Once enabled, you should get a endpoint url that says something like http://example.com.s3-website-us-east-1.amazonaws.com . Save this url to use in later steps.

Enable website redirect for sub domain bucket
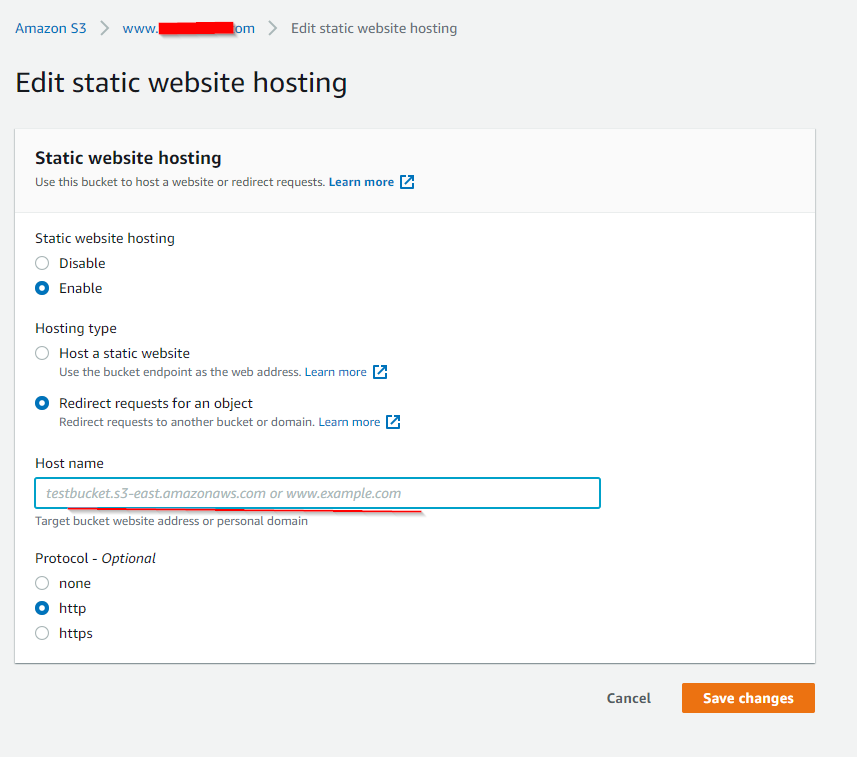
- Now lets go to the bucket with name www.example.com. Again go to settings tab-->scroll down till the end where it says edit static website hosting . In here, this time we will check static website hosting .
-
Then under Hosting type, choose redirect requests for an object . In the Host name section enter example.com or the root domain of your site.
-
Under protocol choose http for now.
Attach a bucket policy
- Now if you open the endpoint url(http://example.com.s3-website-us-east-1.amazonaws.com) for the root domain bucket on your browser, you will get an error shown below:
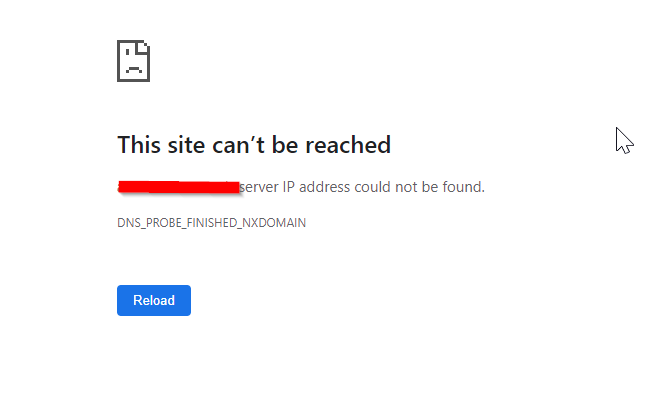
- This happens because although we disabled block public access setting, that doesn't mean the objects inside the bucket have public access. This setting only helped disable the aws last resort policy for s3 objects being public. We still need to give the bucket a policy that allows all objects under it to be publicly accessible. Open the root domain bucket example.com. Go to Permissions tab-->scroll down to Bucket policy section and add the following code:
{
    "Version": "2012-10-17",
    "Statement": [
        {
            "Sid": "PublicReadGetObject",
            "Effect": "Allow",
            "Principal": "*",
            "Action": [
                "s3:GetObject"
            ],
            "Resource": [
                "arn:aws:s3:::example.com/*"
            ]
        }
    ]
}
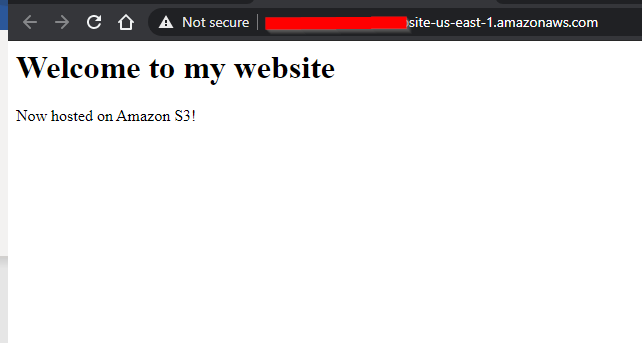
Make sure to replace the example.com with your own root domain bucket name. Save this policy. Now try opening the endpoint url again on your browser. This time you will be able to open your static site.
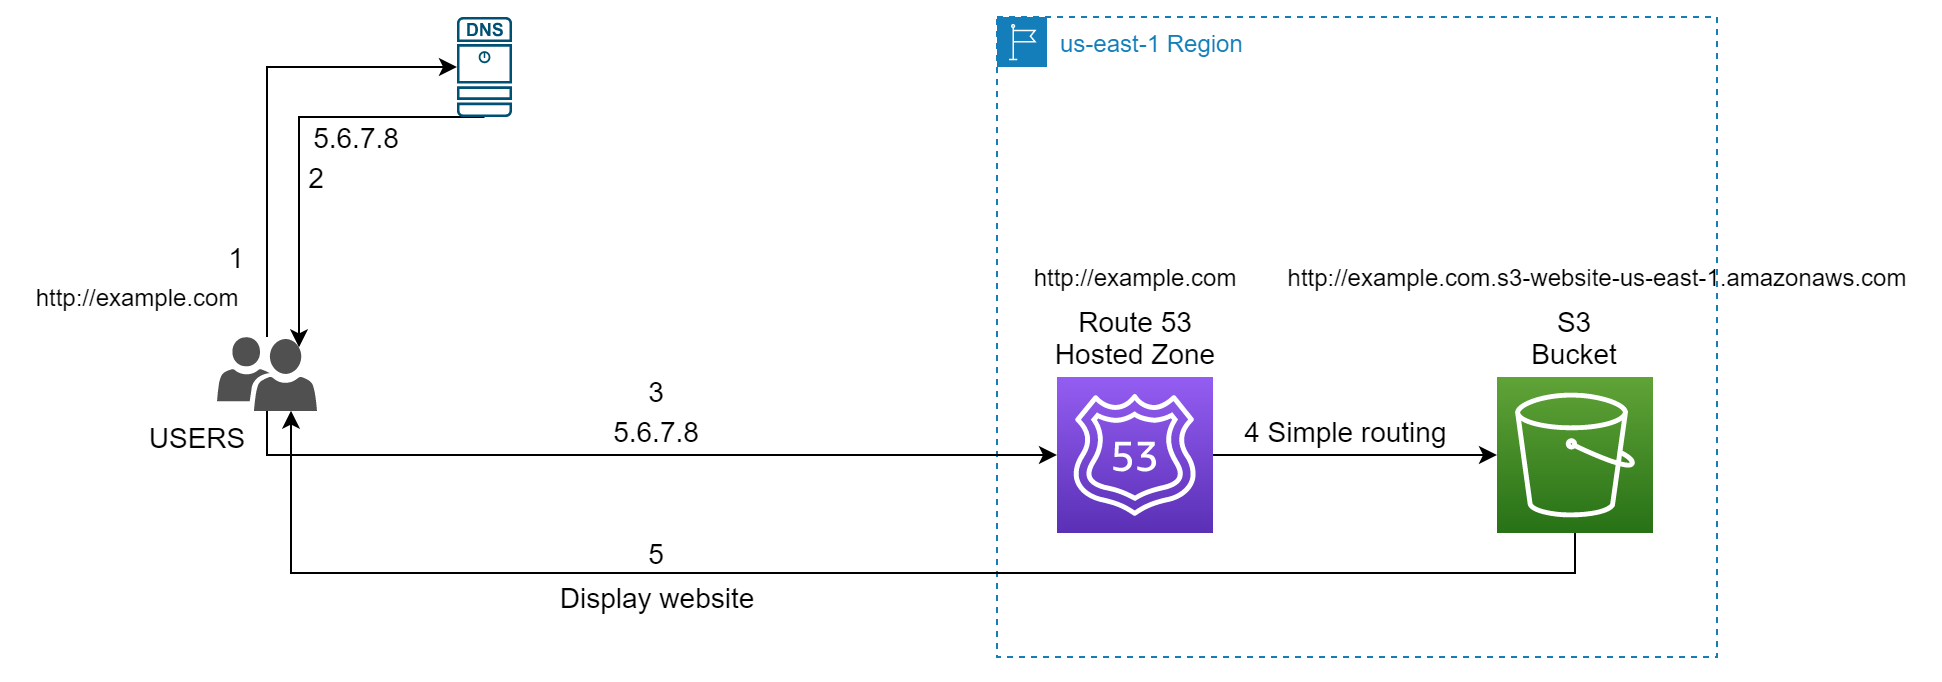
This is how our architecture looks at this point:

Add alias records for your root & subdomain
-
Now also try going to the url http://example.com using your browser. This still gives an error saying its not reachable.
-
This is because the url we registered on Route 53 in first step is not aware of the S3 bucket setup we just did in last couple of sections.
-
Head over to Route 53-->Click on hosted zones -->click on the record for example.com root domain.

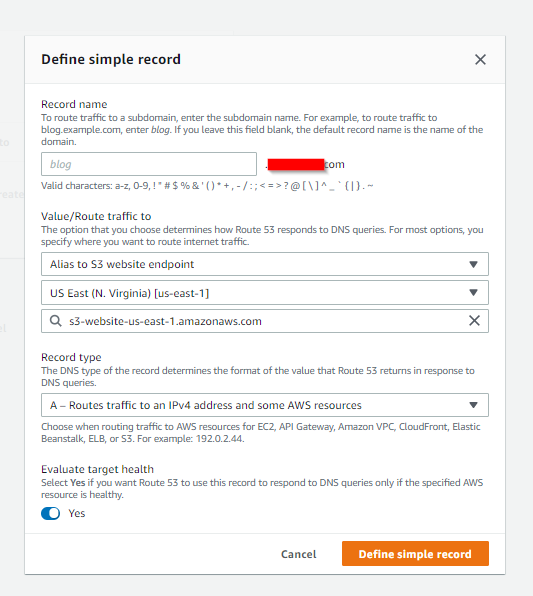
- Hosted zone is a database of different routing policies you want to implement for your example.com address. We will then click on create record -->choose simple record. Under the record name section, no need to enter anything. Accept the root domain example.com.
-
In the Value/Route traffic to section, choose Alias to S3 website endpoint .
-
Then choose the region of your root domain bucket. Also choose the root domain bucket if it shows up in the list. If it doesn't then simply enter the s3 endpoint of the region from the list of S3 endpoints by AWS .
-
Choose A ‐ Routes traffic to an IPv4 address and some AWS resources under the Record type section. Set evaluate target health check box to No and click on Define Simple Record
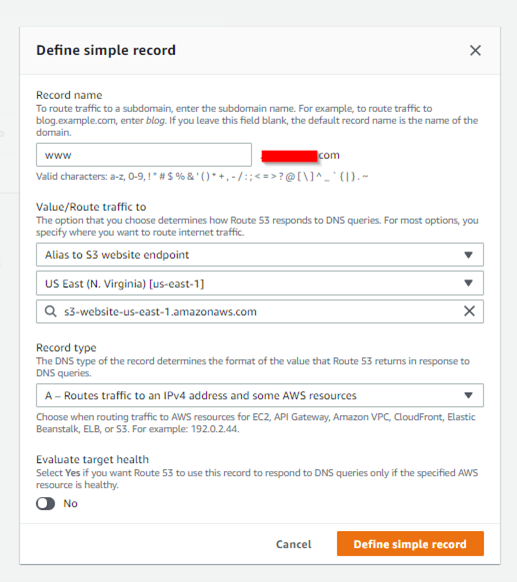
Next, lets add another simple record for the subdomain www.example.com. For this, follow same steps as above. Only difference is here you need to add www under the Record Name section as shown. Rest everything stays the same.
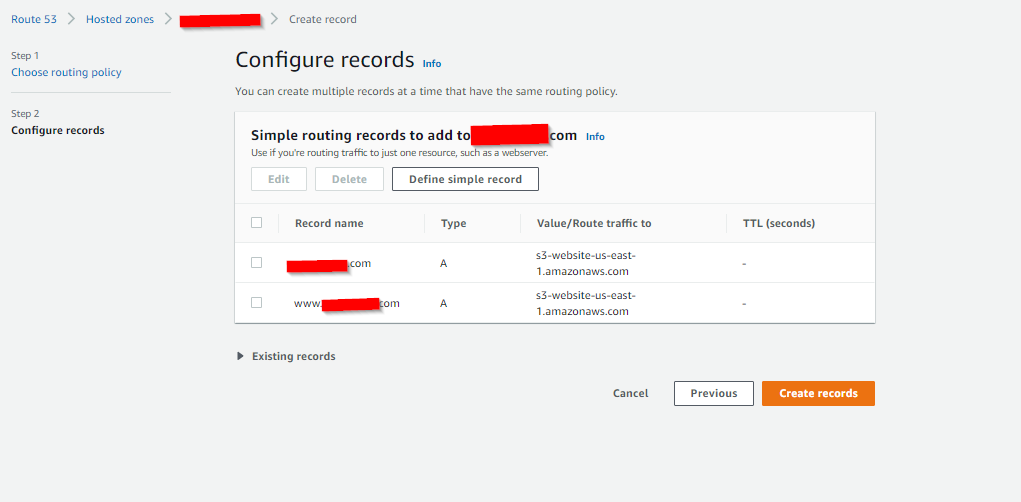
Once the 2 records are setup, this is how your hosted zone looks like:
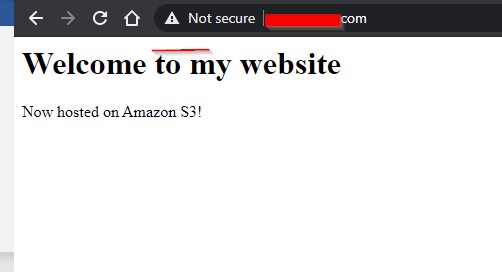
Now to test, just go to example.com on your browser and you will be able to see the index.html page displayed!
This is how our architecture looks at this point:
Setup HTTPS with AWS CloudFront
Now if you notice in above screenshot, only issue is the site example.com is not https enabled. This usually impacts your SEO rankings. To enable https on your static website on S3, we will use AWS CloudFront. It allows us to create a distribution (where you can define origin as your S3 bucket) & deploy it to AWS edge locations(similar to Content Delivery Network) which are more closer to your users. This way it also helps to speed up your website.
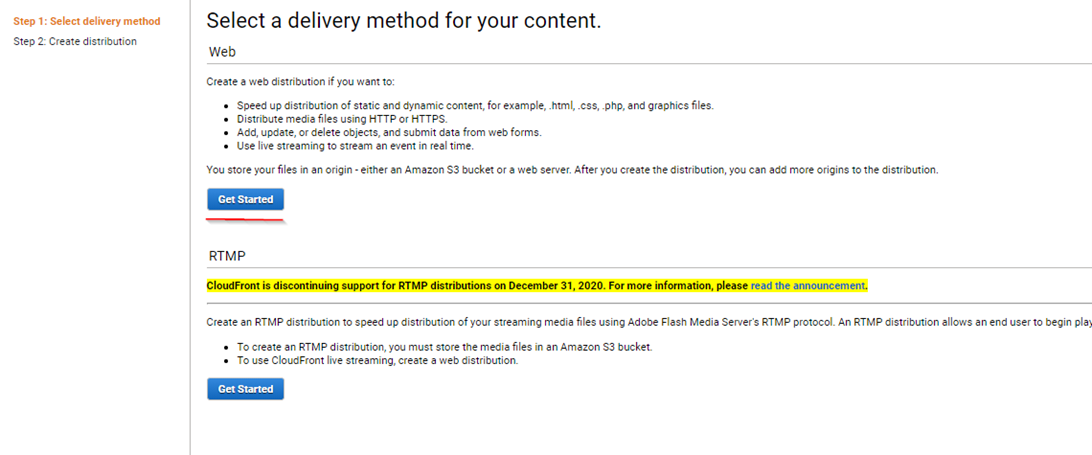
- At first head over to CloudFront console form AWS dashboard. Click Create Distribution--> Select Web as the "delivery method" -->Hit Get Started.
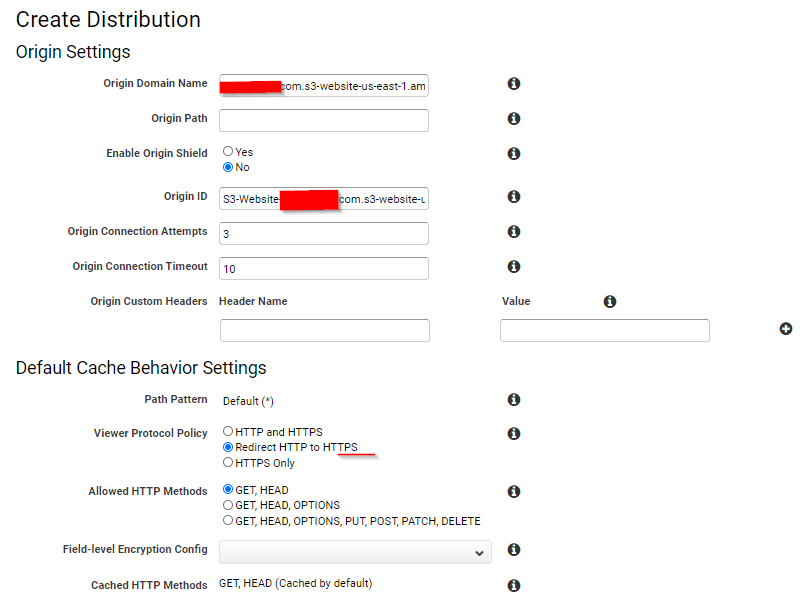
- Under the origin domain name enter only example.com.s3-website-us-east-1.amazonaws.com . Make sure to not have the http before it. Origin id will get populated automatically for you.
-
Choose Redirect HTTP to HTTPS under viewer protocol policy. Rest everything can stay as is.
-
Under Distribution settings, do the following:
- Leave price class to use all edge locations.
- Set Alternate Domain Names to the root domain (example.com) and in next line add subdomain www.example.com
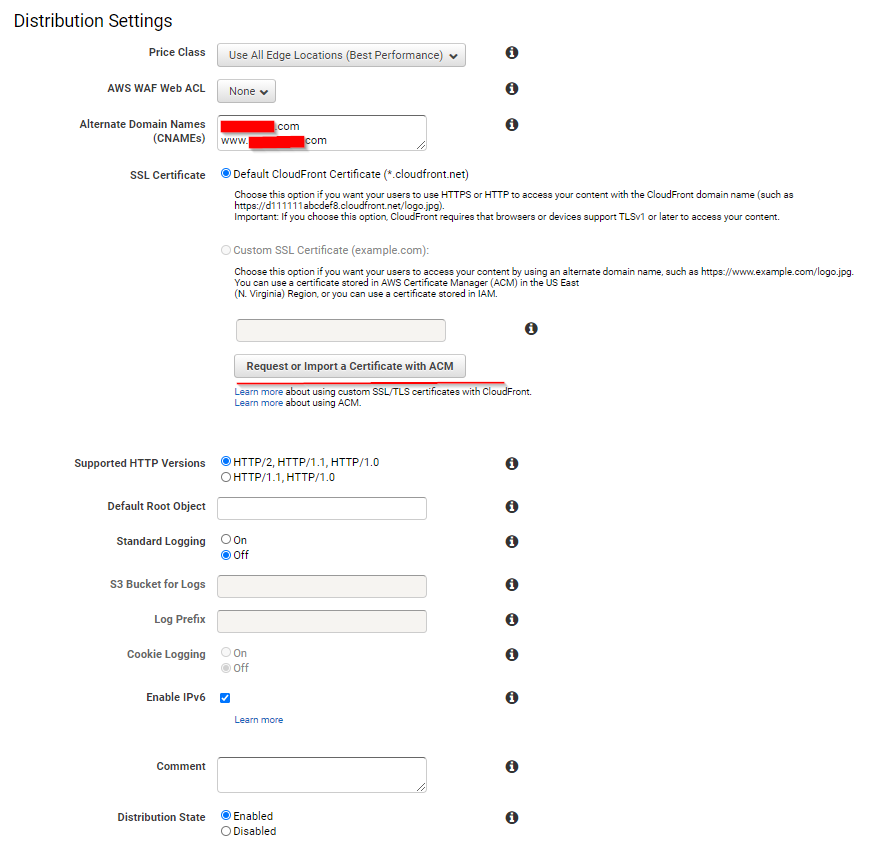
- Enabling https on your site means setting up an SSL cert. You need to get one either externally or using AWS Certificate Manager(ACM). The SSL cert is issued against your root domain and subdomain. Its a certificate from prominent Certificate Authority whom most browsers trust. So if they see a cert from a certificate authority they trust, it will show a SSL lock icon to the user when they visit your site. Right now the custom SSL certificate option is disabled. So do the following:
-
Click on the Request or Import a Certificate from ACM* button. It will open a new screen where you can enter the domain name example.com & subdomain .example.com** to cover any subdomains you may have in future.
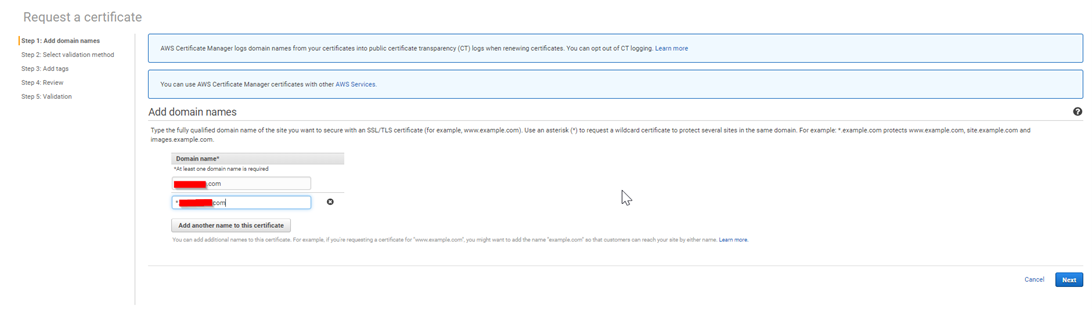
CloudFront - Request Cert
-
Click DNS validation . If your site domain was registered using Route 53, this step becomes very simple. AWS just needs a CNAME record in your hosted zone to verify your ownership of the domain name. You get a drop down option where you can click Create record in Route 53 . Select this and then you will see the new CNAME record show up in your route 53.

CloudFront - DNS Validation
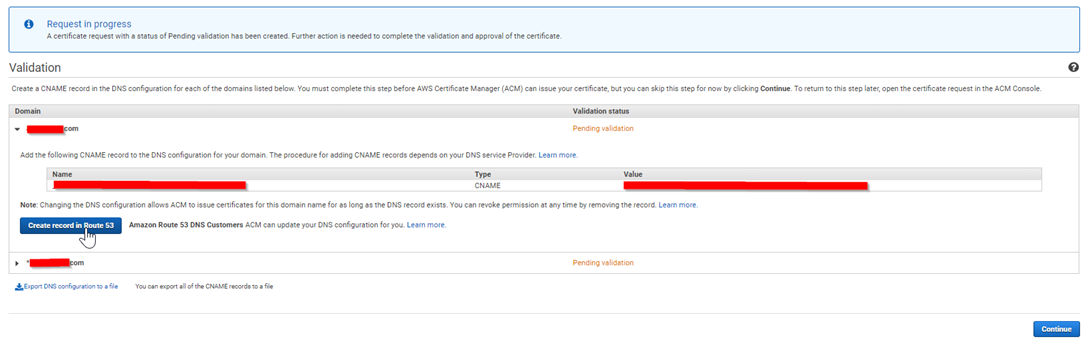
CloudFront - DNS Validation
-
Soon after this validation will be complete and we can move to next step.
-
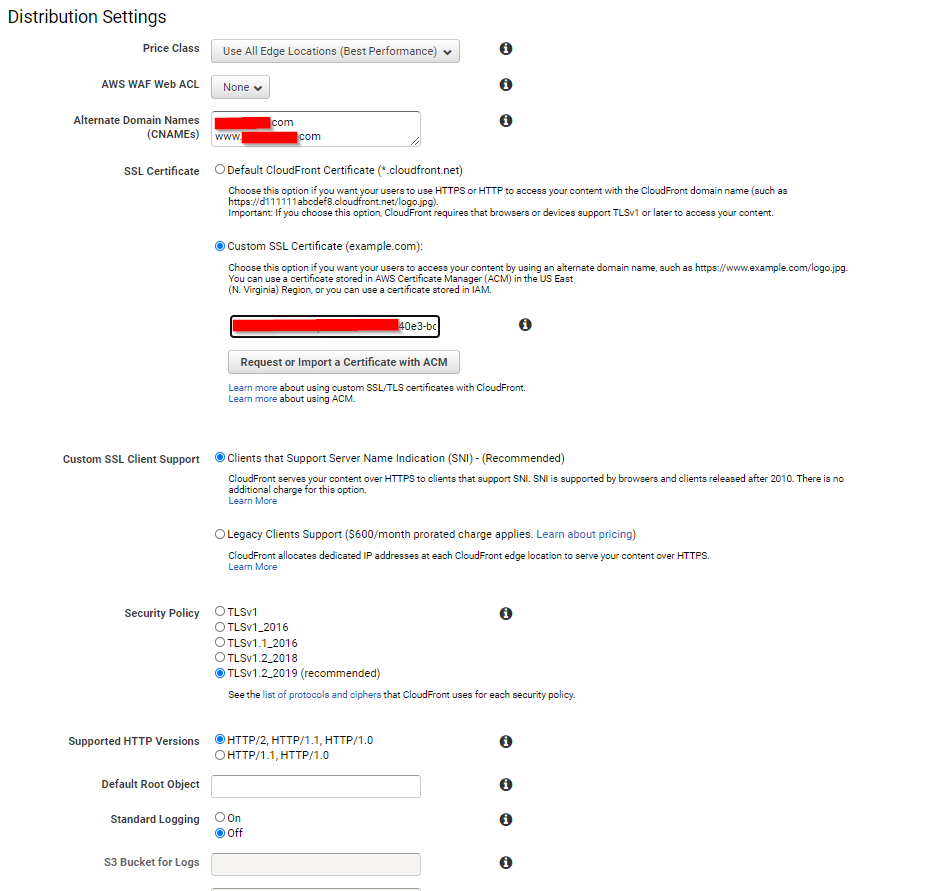
Now go back to the create distribution screen. You will see that the Custom SSL certificate option is now clickable. Choose it and form dropdown select the newly created cert. Leave everything else as is and hit Create Distribution.
Changes again on Route 53
If you remember we earlier made route 53 aware of our s3 endpoint and set it up in a way that s3 bucket data will be returned directly if a user asks for our site from route 53. However, in the previous step we just setup a CloudFront distribution. This sits in between the s3 bucket and the user requests. It can help in caching data form our bucket and helping make our sites faster and https compliant. This itself can be setup as a source instead of S3 bucket in route 53. This is what we will do in this section.
-
Head over to Route 53 console at https://console.aws.amazon.com/route53/
-
Click on Hosted Zones & open the zone for example.com.
-
Next, open the A record for example.com root domain we created a few sections ago. Here in, delete the existing s3 url under Value/Route Traffic to section.
-
From the dropdown, choose Alias to CloudFront distribution instead of Alias to S3 website endpoint .
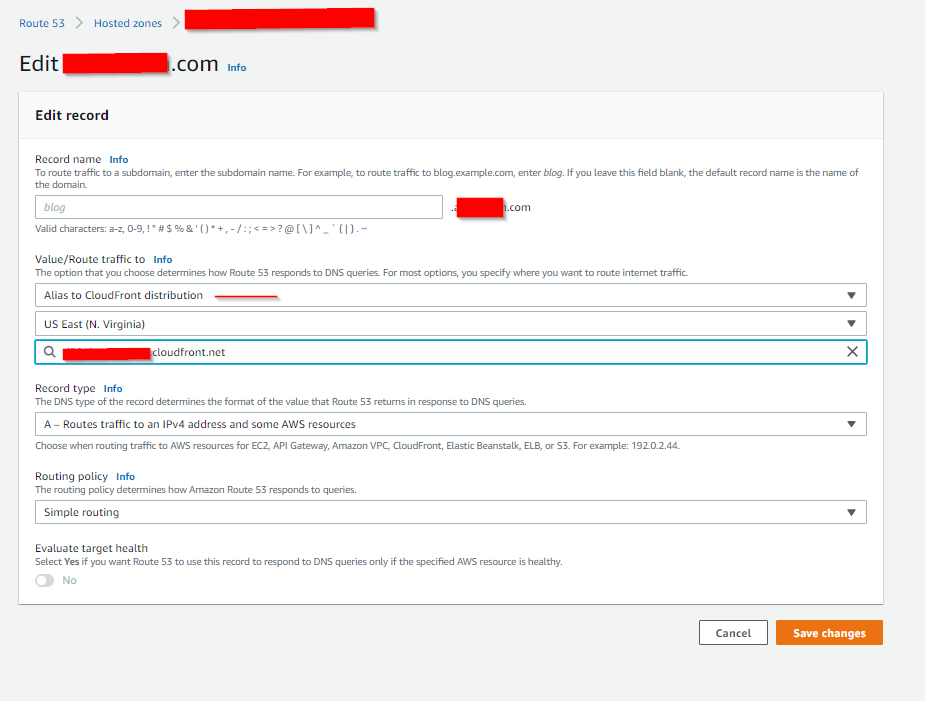
-
In the next dropdown, choose the distribution id you just created in previous section.
-
Make similar changes for the record for subdomain so it routes incoming traffic to the CloudFront Distribution.
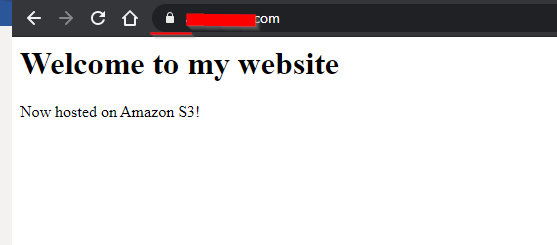
Now if we go to example.com on the browser, we see that it has https enabled!
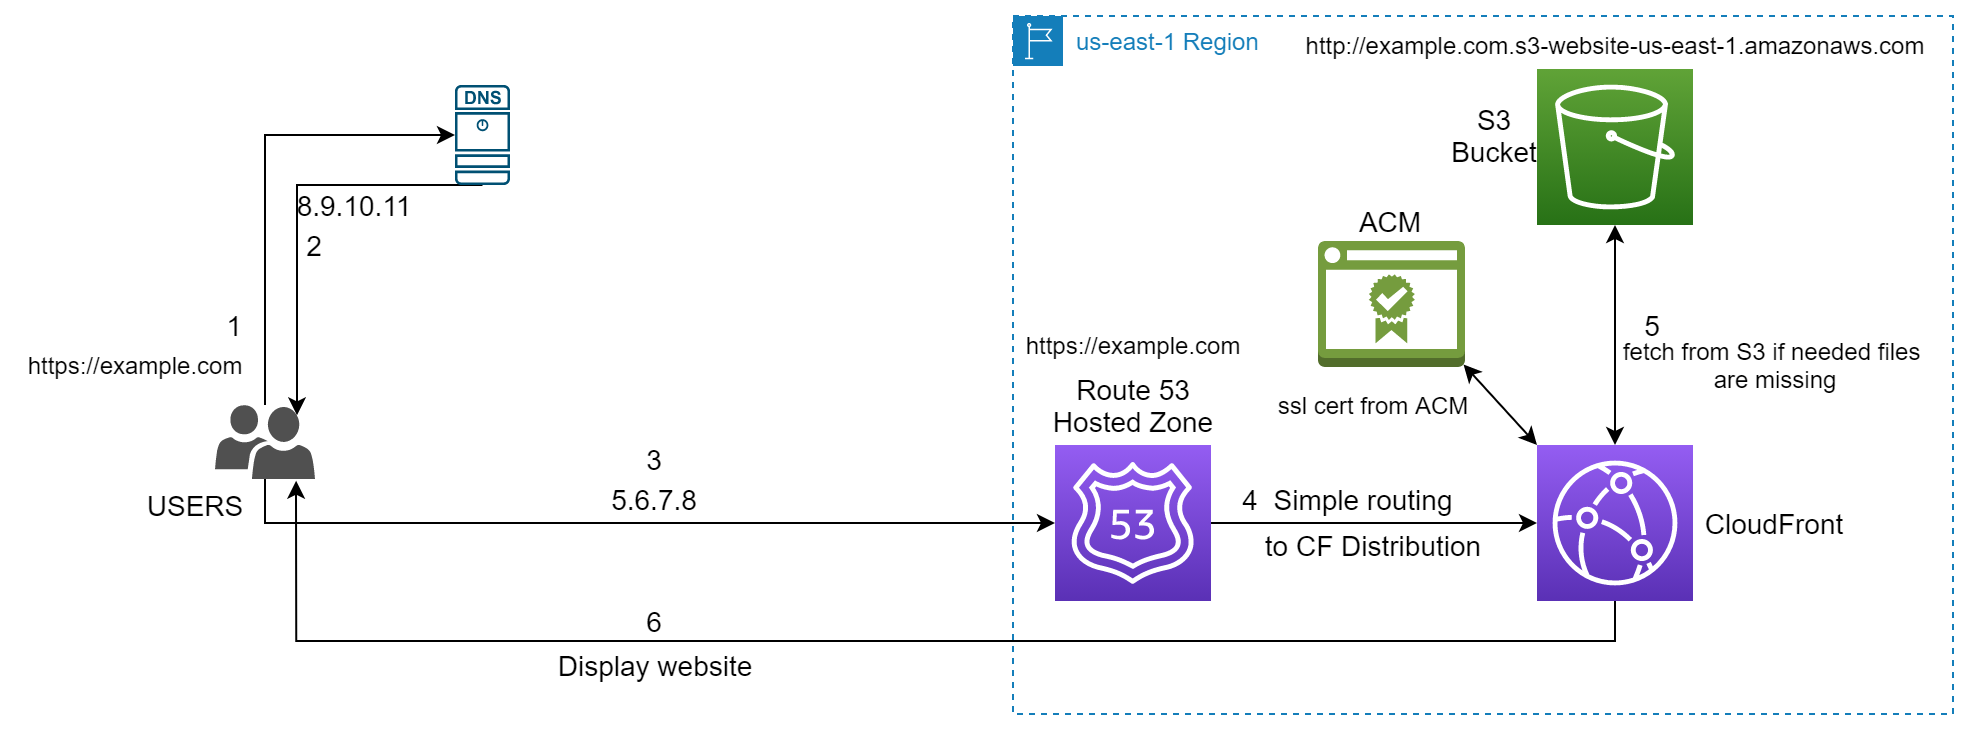
Right now our overall architecture looks something like this:
If you want to improve more on security of this architecture, you can even add an Origin Access Identity (OAI) and change the S3 bucket policy to allow read only from the OAI and not make it public anymore for anonymous access. However this will be a topic for another blog post. Another thing to note is that we only used boilerplate index.html and error.html pages. But ideally you can use static site generators like Pelican , Gatsby etc. to create css, html pages with all your content. There is also ability to integrate your site changes with code pipeline or git actions, so the moment you push your changes to a repo, then it will get uploaded to S3 bucket and be available on your site immediately.
Please let me know how your experience was when setting up a static website on S3. Was this post helpful? Let me know if you want me to tackle any other challenges in the world of AWS.
Comments